本文可以结合博主操作视频参考安装,更便于理解。
参考视频地址:
- PVE9安装教程| https://www.bilibili.com/video/BV12VBMBFEc2/
- PVE8安装教程1️⃣|https://www.bilibili.com/video/BV1UtfBY5Esq/
- PVE8安装教程2️⃣|https://www.bilibili.com/video/BV1VafGY2EE1/

一、PVE系统安装
1、下载PVE系统及写盘软件
PVE系统官网下载(选择种子下载更快):点此下载
2、WinPE格式硬盘(按需要)
按需要,不是恢复硬盘里已有系统,硬盘数据也做好了备份,清除一下硬盘可以避免一些未知问题。
推荐Ventoy:点此下载
Ventoy在折腾各种系统时无需反复地格式化U盘,你只需要把 ISO/WIM/IMG/VHD(x)/EFI 等类型的文件直接拷贝到U盘里面就可以启动了。
建议找一个16G以上的U盘,按照Ventoy官方文档写盘,写盘结束后将下载的PVE系统拷贝进U盘。
其他工具rufus、balenaEtcher类似。
4、BIOS设置
开机按快捷键进入BIOS
- intel主板开启VT,VT-D
- AMD主板开启IOMMU,SVM / AMD-Vi
- 开启硬盘热拔插
- 开启Above4G,SR-IOV(若有)
- 开启网络唤醒(若需要)
- 打开UEFI引导,关闭CSM兼容模式(DG1等纯UEFI类的显卡需要)
- Resizable BAR / Re-Size BAR Support (可选开启,对部分 AMD 核显直通有帮助)
- 禁用Secure Boot
- 开启来电自
- 选择U盘启动
5、安装PVE系统
详细安装教程见视频。
1)启动安装:从U盘启动,选择 “Install Proxmox VE”。
2)配置选项:
- 目标硬盘:选择要安装系统的硬盘(会被格式化)。
- 地区与时区:选择 “
China” 和 “Shanghai”。 - 管理员密码:为
root用户设置强密码。 - 网络配置(关键步骤):选择管理网口,若连接网线,通常选第一个。
- 主机名:随意设置,但必须改。
- IP地址:强烈建议设置为与路由器同网段的静态IP。
- PVE IP:
10.0.0.254/24(网段和IP按照自己的喜好设置即可) - 子网掩码:
255.255.255.0 - 网关:
10.0.0.1 - DNS:
10.0.0.1
3)完成安装:
确认信息后开始安装。完成后重启并拔掉U盘,在提示界面中记住PVE的管理地址(例如 https://10.0.0.254:8006)
重启后,在浏览器中输入登陆地址(登录电脑需要在同网段):https://10.0.0.254:8006
用户名:root
密码:你设置的
6、给PVE的扩容(可选项)
移除local-lvm可能会影响PVE的部分快照功能,安装盘够大可以不合并。
在shell里边输入:
lvremove pve/data
点击y后,再输入:
lvextend -l +100%FREE -r pve/root
再点击数据中心 – 存储 – local-lvm – 移除,再双击local,把内容里的所有选项都选中。
7、去除PVE无有效订阅提示
pve9版本可以执行:
# 替换弹窗代码 + 重启服务(直接复制执行,无需手动改文件)
sed -Ezi.bak "s/(Ext.Msg.show\(\{\s+title: gettext\('No valid sub)/void\(\{ \/\/\1/g" /usr/share/javascript/proxmox-widget-toolkit/proxmoxlib.js

# 重启服务生效
systemctl restart pveproxy.service
pve8版本可以执行:
sed -i.backup -z "s/res === null || res === undefined || \!res || res\n\t\t\t.data.status.toLowerCase() \!== 'active'/false/g" /usr/share/javascript/proxmox-widget-toolkit/proxmoxlib.js && systemctl restart pveproxy.service
pve6.3版本到pve7版本可以执行:
sed -Ezi.bak "s/(Ext.Msg.show\(\{\s+title: gettext\('No valid sub)/void\(\{ \/\/\1/g" /usr/share/javascript/proxmox-widget-toolkit/proxmoxlib.js && systemctl restart pveproxy.service
8、开启PVE直通功能
shell里输入如下命令:
#若你的CPU为Intel:
sed -i '/^GRUB_CMDLINE_LINUX_DEFAULT/c\GRUB_CMDLINE_LINUX_DEFAULT="quiet intel_iommu=on iommu=pt pcie_acs_override=downstream,multifunction"' /etc/default/grub

#若你的CPU为AMD修改为
sed -i '/^GRUB_CMDLINE_LINUX_DEFAULT/c\GRUB_CMDLINE_LINUX_DEFAULT="quiet amd_iommu=on iommu=pt pcie_acs_override=downstream,multifunction"' /etc/default/grub

# 参数释义,可根据实际需求将下列参数更新到上述代码的“quiet xxxxx ”中,然后在运行。
1.iommu=pt:启用 Intel VT-d 或 AMD-Vi 的 IOMMU。这是一种硬件功能,用于管理设备对系统内存的访问。在虚拟化环境中,启用 IOMMU 后,可以将物理设备直通到虚拟机中,以便虚拟机可以直接访问硬件设备。“iommu=pt”不是必须的,PT模式只在必要的时候开启设备的IOMMU转换,可以提高未直通设备PCIe的性能,建议添加。
2.initcall_blacklist=sysfb_init:禁用 sysfb_init 内核初始化函数。这个函数通常用于在内核启动过程中初始化系统帧缓冲。在使用 GPU 直通的情况下,这个函数可能会干扰直通操作,因此需要禁用它。
3.i915.enable_gvt=1:启用 Intel GVT-g 虚拟 GPU 技术。这个选项用于创建一个虚拟的 Intel GPU 设备,以便多个虚拟机可以共享物理 GPU 设备。启用 GVT-g 需要在支持虚拟 GPU 的 Intel CPU 和主板上运行,并且需要正确配置内核和虚拟机。想开启GVT-g的就添加这条,显卡直通的就不要添加了。
4.initcall_blacklist=sysfb_init:屏蔽掉pve7.2以上的一个bug,方便启动时候就屏蔽核显等设备驱动;
5.pcie_acs_override=downstream,multifunction:便于iommu每个设备单独分组,以免直通导致物理机卡死等问题
6.pci=nommconf:意思是禁用pci配置空间的内存映射,所有的 PCI 设备都有一个描述该设备的区域(您可以看到lspci -vv),访问该区域的最初方法是通过 I/O 端口,而 PCIe 允许将此空间映射到内存以便更简单地访问。
增加所需模块,修改文件/etc/modules,输入如下命令:
echo -e "vfio\nvfio_iommu_type1\nvfio_pci\nvfio_virqfd" | tee -a /etc/modules
更新上述配置信息并重启PVE:
update-grub
update-initramfs -u -k all
reboot
验证是否已开启iommu:
dmesg | grep iommu
看看可直通设备列表:
lspci

#或
lspci -D -nnk
二、虚拟路由安装
给PVE通网(若你准备搭建集成路由的All in one);
若你的路由是独立于PVE的硬件和系统,请将你的PVE管理口连接至已通网的路由器,直接跳转至换源)。
1、安装iKuai (主路由,若需要)
下载iKuai官方镜像:点此下载
添加要直通的网卡,对应好网口,设置wan、lan
网关设为10.0.0.1(主路由IP)
DNS可用阿里223.5.5.5和腾讯119.29.29.29
默认用户名:admin,默认密码:admin
进入Shell ping下试试网络是否正常
ping baidu.com
2、安装iStoreOS或OpenWrt(旁路由,若需要)
iStoreOS是基于OpenWrt开发的,大家看个人喜好,我这里以iStoreOS为例。
下载iStoreOS镜像:点此下载
img文件挂载(如果你没有扩容的话,你可能需要在下面命令的后边加上-lvm,如:qm importdisk pve虚拟机id img文件路径 local-lvm):
#pve虚拟机id和img文件路径替换为自己的
qm importdisk pve虚拟机id img文件路径 local

#如:
qm importdisk 101 /var/lib/vz/template/iso/istoreos.img local
修改IP,输入以下命令快速设置:
quickstart
旁路有网关设为10.0.0.1(旁路由IP)
默认用户名:root,默认密码:password
iStoreOS插件下载:
https://github.com/AUK9527/Are-u-ok/tree/main/x86
三、给PVE换源(建议)
目前使用DG1直通硬解的目前不要进行换源,更新PVE配置后DG1直通后无法驱动!!
注意:这里需要PVE联网正常才可以操作:
可以ping一下网络,ping baidu.com ,如果ping不通,则要检查网关和DNS:
- pve–>网络–>网关,检查是否与路由网关相同?比如本文网关设为
10.0.0.1(主路由IP) - pve–>DNS–>编辑,新增两个DNS:阿里
223.5.5.5或腾讯119.29.29.29、谷歌8.8.8.8
国内源清华源和中科大较快,可根据地理位置就近选一个即可:
PVE 9.x更换国内源:
PVE 8.x及以前版本点此直接跳转换源
1、Debian 软件源(系统基础源,必须换)
Debian 13用新的DEB822格式(不再是旧的sources.list),直接覆盖配置:
# 备份原文件(防止出错可恢复)
cp /etc/apt/sources.list.d/debian.sources /etc/apt/sources.list.d/debian.sources.bak

#如果修改后出现问题,使用命令即可还原:
cp /etc/apt/sources.list.d/debian.sources.bak /etc/apt/sources.list.d/debian.sources
清华源与中科大源2选1,建议按距离选择:
或更换清华源(直接复制执行,无需手动编辑):
cat > /etc/apt/sources.list.d/debian.sources << 'EOF'
Types: deb
URIs: https://mirrors.tuna.tsinghua.edu.cn/debian/
Suites: trixie trixie-updates trixie-backports
Components: main contrib non-free non-free-firmware
Signed-By: /usr/share/keyrings/debian-archive-keyring.gpg

# 安全更新源(默认保留官方,稳定不折腾)
Types: deb
URIs: https://security.debian.org/debian-security/
Suites: trixie-security
Components: main contrib non-free non-free-firmware
Signed-By: /usr/share/keyrings/debian-archive-keyring.gpg
EOF
或更换中科大源(直接复制执行,无需手动编辑):
cat > /etc/apt/sources.list.d/debian.sources << 'EOF'
Types: deb
URIs: https://mirrors.ustc.edu.cn/debian/
Suites: trixie trixie-updates trixie-backports
Components: main contrib non-free non-free-firmware
Signed-By: /usr/share/keyrings/debian-archive-keyring.gpg

# 安全更新源(默认保留官方,稳定不折腾)
Types: deb
URIs: https://security.debian.org/debian-security/
Suites: trixie-security
Components: main contrib non-free non-free-firmware
Signed-By: /usr/share/keyrings/debian-archive-keyring.gpg
EOF
2、禁用PVE企业源:
PVE 默认的企业源需要订阅才能用,普通用户直接禁用。
#注释掉企业源(在每一行开头加 #,不删除原内容,方便后续恢复):
nano /etc/apt/sources.list.d/pve-enterprise.sources
按Ctrl+X -> Y – >回车退出。
3. 更换无订阅源(获取 PVE 官方免费更新)
清华源与中科大源2选1,建议按距离选择:
或直接创建并写入清华无订阅源(直接复制执行,无需手动编辑):
cat > /etc/apt/sources.list.d/pve-no-subscription.sources << 'EOF'
Types: deb
URIs: https://mirrors.tuna.tsinghua.edu.cn/proxmox/debian/pve
Suites: trixie
Components: pve-no-subscription
Signed-By: /usr/share/keyrings/proxmox-archive-keyring.gpg
EOF
或直接创建并写入中科大无订阅源(直接复制执行,无需手动编辑):
cat > /etc/apt/sources.list.d/pve-no-subscription.sources << 'EOF'
Types: deb
URIs: https://mirrors.ustc.edu.cn/proxmox/debian/pve
Suites: trixie
Components: pve-no-subscription
Signed-By: /usr/share/keyrings/proxmox-archive-keyring.gpg
EOF
4、更换Ceph源(用则换,不用则跳过):
若搭建 Ceph 存储集群,则换源;若只是普通用虚拟机,直接跳过。
备份原文件(防止出错可恢复):
cp /etc/apt/sources.list.d/ceph.sources /etc/apt/sources.list.d/ceph.sources.bak
清华源与中科大源2选1,建议按距离选择:
或更换清华源:
cat > /etc/apt/sources.list.d/ceph.sources << 'EOF'
Types: deb
URIs: https://mirrors.tuna.tsinghua.edu.cn/proxmox/debian/ceph-squid
Suites: trixie
Components: no-subscription
Signed-By: /usr/share/keyrings/proxmox-archive-keyring.gpg
EOF
或更换中科大源
cat > /etc/apt/sources.list.d/ceph.sources << 'EOF'
Types: deb
URIs: https://mirrors.ustc.edu.cn/proxmox/debian/ceph-squid/
Suites: trixie
Components: no-subscription
Signed-By: /usr/share/keyrings/proxmox-archive-keyring.gpg
EOF
5. 更新CT源(若不需要LXC,可跳过)
LXC 容器的模板下载源,换清华源后下载速度翻倍:
备份原文件:
cp /usr/share/perl5/PVE/APLInfo.pm /usr/share/perl5/PVE/APLInfo.pm_back
清华源与中科大源2选1,建议按距离选择:
或更换清华源:
sed -i -e 's|http://download.proxmox.com|https://mirrors.tuna.tsinghua.edu.cn/proxmox|g' \
       -e 's|https://appcenter.proxmox.com|https://mirrors.tuna.tsinghua.edu.cn/proxmox|g' \
       /usr/share/perl5/PVE/APLInfo.pm
或更换中科大源
sed -i -e 's|http://download.proxmox.com|https://mirrors.ustc.edu.cn/proxmox|g' \
       -e 's|https://appcenter.proxmox.com|https://mirrors.ustc.edu.cn/proxmox|g' \
       /usr/share/perl5/PVE/APLInfo.pm
PVE 8.x及以前版本更换国内源:
让更新源生效
更新生效:
apt update && apt dist-upgrade -y
重启服务:
systemctl restart pvedaemon.service
重启PVE
reboot
PVE优化、美化(可选项)
显示cpu、nvme、主板温度,来自恩山大佬点击查阅:
(curl -Lf -o /tmp/temp.sh https://raw.githubusercontent.com/a904055262/PVE-manager-status/main/showtempcpufreq.sh || curl -Lf -o /tmp/temp.sh https://mirror.ghproxy.com/https://raw.githubusercontent.com/a904055262/PVE-manager-status/main/showtempcpufreq.sh) && chmod +x /tmp/temp.sh && /tmp/temp.sh remod
四、开启核显SR-IOV(若需要)
操作前一定要确认自己的核显是否支持SR-IOV!!!
注意事项
-
Intel:核显支持范围较明确。主要是第12代(Alder Lake)、第13代(Raptor Lake)、第14代(Raptor Lake Refresh)酷睿及部分新款酷睿Ultra(如Arrow Lake)处理器。更老的CPU核显不支持SR-IOV。
-
AMD:官方信息显示其面向云计算的Radeon PRO V系列支持SR-IOV。但消费级Radeon显卡或Ryzen APU核显通常认为这些产品不支持。
-
NVIDIA:目前的搜索结果中,没有找到任何官方信息表明其消费级或企业级GPU支持SR-IOV。其虚拟化方案主要是需要许可的vGPU技术
| 厂商 | 产品类型 | SR-IOV 支持情况 | 关键说明 |
|---|---|---|---|
| Intel | 核芯显卡 (iGPU) |
第12-14代酷睿及部分酷睿Ultra支持。 常见的支持型号: |
最普遍可用的SR-IOV方案。需注意,第11代CPU(如i7-1165G7)的核显硬件支持SR-IOV,但早期的Linux驱动可能不支持。 |
| Intel | 专业独显 | Intel Data Center GPU Flex 系列支持。 消费级Arc A系列独显不支持。 |
数据中心GPU是专为虚拟化设计的。 |
| AMD | 专业独显 | Radeon PRO V系列加速器(如V520/V620/V710)支持。 | 主要是面向云计算和数据中心的产品,常见于AWS/Azure云服务。 |
| NVIDIA | 专业/企业级独显 | 不支持。 其企业级GPU(如Tesla系列)主要通过vGPU技术实现虚拟化。 | NVIDIA的vGPU是另一种虚拟化方案,通常需要付费许可证,与基于硬件的SR-IOV在技术和生态上不同。 |
开启SR-IOV项目地址:https://github.com/strongtz/i915-sriov-dkms
请逐条运行:
apt install build-* dkms git sysfsutils -y
apt install proxmox-headers-$(uname -r) proxmox-kernel-$(uname -r)
cd ~
clone代码库(此处需要pve连接github,可试试修改DNS,比如8.8.8.8,8.8.4.4等)
git clone https://github.com/strongtz/i915-sriov-dkms.git
也可以使用国内镜像代码库,但在使用前查看代码是否最新或可用。
git clone https://gitee.com/ifwwww/i915-sriov-dkms
安装sriov模块,请逐条运行:
cd ~/i915-sriov-dkms
dkms add .
这里因大佬版本变化,与视频不一样,特更新文字版教程如下:
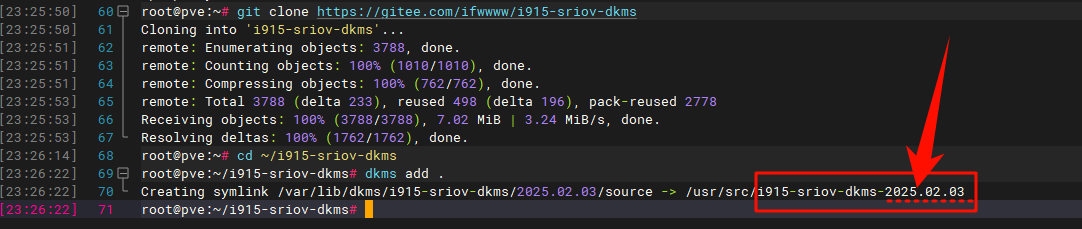
这里记录出现的i915-sriov-dkms版本号,比如此时示范时如上图所示版本号为“2025.02.03”(该版本号会变,请以你的实际版本为准),将下面这行代码中的汉字替换为你的版本号再运行代码:
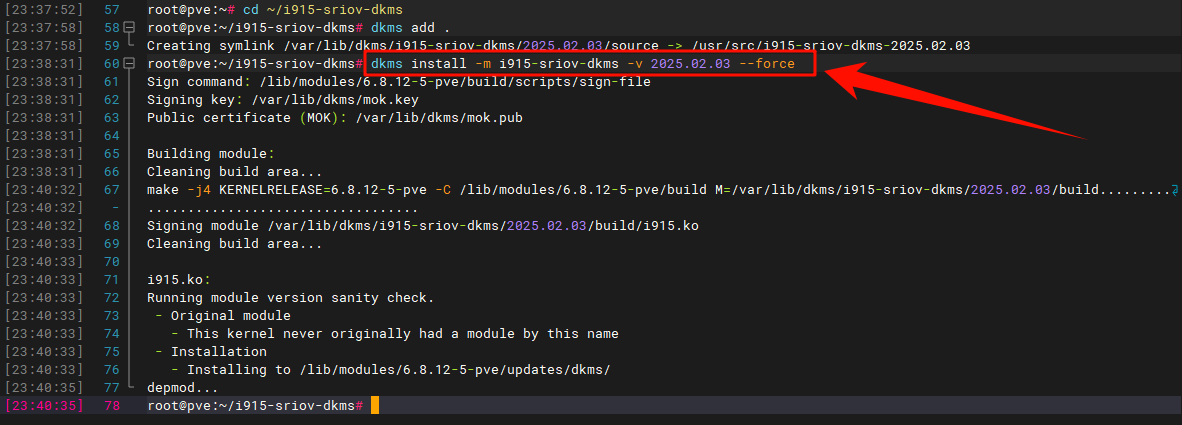
dkms install -m i915-sriov-dkms -v 把这里换成版本号 --force
这个运行需要一点时间,请耐心等待,如下图所示:
编辑 grub 配置文件
nano /etc/default/grub
在 quiet 后添加i915.enable_guc=3 i915.max_vfs=7的“7”表示可以添加7个虚拟核显(最多7个):
i915.enable_guc=3 i915.max_vfs=7
键盘组合键ctrl+x再输入y 回车保存退出
更新grub和initramfs
update-grub
update-initramfs -u
查看当前核显ID,并记录:
lspci -D -nnk | grep VGA
将上面记录的核显ID替换下面代码中的0000:00:02.0,sriov_numvfs = 7 中的 7 是需要虚拟的核显数量,不能大于7,添加数量越多同时使用时核显性能越弱,大家按需选择,我这里设置为7:
echo "devices/pci0000:00/0000:00:02.0/sriov_numvfs = 7" > /etc/sysfs.conf
reboot
重启在PVE的Shell中输入以下命令查看SR-IOV核显直通是否成功:
lspci | grep VGA
输出以下数据,表示成功
0000:00:02.0 VGA compatible controller: Intel Corporation AlderLake-S GT1 (rev 0c)
0000:00:02.1 VGA compatible controller: Intel Corporation AlderLake-S GT1 (rev 0c)
0000:00:02.2 VGA compatible controller: Intel Corporation AlderLake-S GT1 (rev 0c)
0000:00:02.3 VGA compatible controller: Intel Corporation AlderLake-S GT1 (rev 0c)
0000:00:02.4 VGA compatible controller: Intel Corporation AlderLake-S GT1 (rev 0c)
0000:00:02.5 VGA compatible controller: Intel Corporation AlderLake-S GT1 (rev 0c)
0000:00:02.6 VGA compatible controller: Intel Corporation AlderLake-S GT1 (rev 0c)
0000:00:02.7 VGA compatible controller: Intel Corporation AlderLake-S GT1 (rev 0c)
若想卸载i915-sriov-dkms,操作如下:
使用dpkg卸载package
dpkg -P i915-sriov-dkms
使用pacman卸载package
pacman -R i915-sriov-dkms
使用manual卸载 dkms 模块(下面代码改为自己的版本号,这里以2025.02.03为例)
dkms remove i915-sriov-dkms/2025.02.03
重启PVE
reboot
五、虚拟机安装(按需选择)
前3个NAS或者其他NAS大家按需选择安装即可。
1、安装fnOS
飞牛NAS官网:飞牛私有云 fnOS (fnnas.com)
查询直通设备ID:
lspci
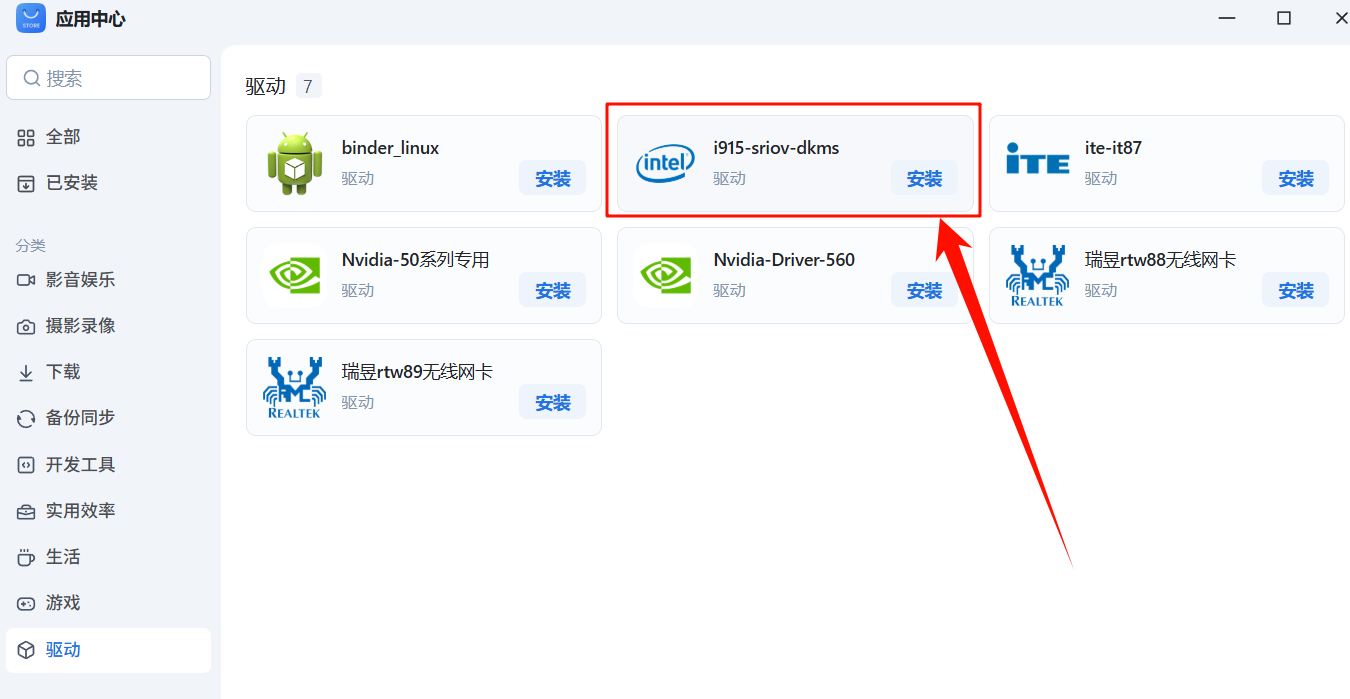
先不带核显安装好fnOS,进入飞牛后在应用中心安装i915-sriov-dkms驱动:
若不能驱动再用手动安装驱动,借用皮蛋熊大佬的DG1驱动:
本教程来自皮蛋熊大佬分享的驱动,感谢大佬的辛苦付出:飞牛NAS使用DG1教程
sudo -i # 切换root权限
wget https://blog.kkk.rs/upload/intel-i915.deb # 下载驱动
dpkg -i intel-i915.deb # 安装驱动
驱动安装完成后关机,添加SR-IOV虚拟的核显(切记不可直通第1个主显卡或者勾选所有功能,否则所有虚拟核显消失,需重新开启VF),再开机测试硬解情况。
降低视频分辨率检验硬解效果,可以看看飞牛CPU占用情况,不异常高就表示成功了。
播放测试也可以在PVE中安装工具查看核显调用情况:
intel:
apt install intel-gpu-tools -y

#查看核显sriov使用率:
intel_gpu_top -d sriov
AMD查看显存占用:
apt install radeontop

#输出包含显存使用量、GPU负载、温度等关键指标,按m键可切换显存视图。
radeontop
ssh登陆抓取如下信息:
sudo -i # 输入密码切换到root账户
dmesg | grep i915 # 看看是否有报错等输出
ls /dev/dri # 看看是否有 card0 renderD128 这种节点
飞牛系统每次更新后都需要检查驱动是否失效,若失效可按照上述步骤重新安装一次驱动。
2、安装黑群晖
使用RR引导安装:RR官网下载
核显驱动查验:
sudo -i
ls -la /dev/dri
#或
ls /dev/dri

#检查lsmod i915模块
lsmod | grep i915

#检查dmesg i5固件
dmesg | grep i915
N大Jellyfin Docker版镜像(需解决联网问题):
docker pull nyanmisaka/jellyfin:latest
3、安装TrueNAS
下载TrueNAS官方OS系统:https://www.truenas.com/
4、安装Windows
我这里使用的不忘初心win10 LTSC的镜像。
1️⃣夸克网盘下载:https://pan.quark.cn/s/2af51ea81711提取码:tsBZ
2️⃣百度云盘下载:https://pan.baidu.com/s/1ZiHWZti-VOWtan3dhGpOew?pwd=fqkj提取码:fqkj
virtIO驱动ISO:点此下载
系统安装时先不要添加虚拟核显,也不要勾选主GPU(选择主GPU就要将显示改为VirtIO-GPU,否则VNC中无画面),在系统安装完后再添加。
英特尔® Arc™ 和锐炬® Xe 显卡 (intel.cn)
https://www.intel.cn/content/www/cn/zh/download/785597/intel-arc-iris-xe-graphics-windows.html
♥若想要直通核显,并直接显示输出画面到显示器,可以查看这篇博文:
《PVE直通Intel/AMD核显显示器输出画面:ROM定制,MMTool提取GOP/VBIOS教程》
5、安装LXP容器
从PVE9.1开始可以使用OCI镜像直接创建LXC Docker容器,减少套娃,进一步提高性能。下面以N大的jellyfin为例演示,操作步骤如下:
1️⃣拉取OCI镜像并创建容器
在PVE网页,点击本地存储(如local),点击 “CT模板” 区域,选择“Pull from OCI Registry”(即“从OCI注册表拉取”)。在“参考”栏输入 nyanmisaka/jellyfin:latest(没有科学的上网方法可以添加国内镜像链接,比如:docker.1ms.run/nyanmisaka/jellyfin:latest),也可不带版本,点击“查询标签”后选择特定版本(一般选 latest),最后点击“下载”。拉取成功后,像创建普通LXC一样创建容器,并在模板中选择你刚拉取的Jellyfin镜像,勾选“无特权的容器”和“嵌套”。
参考文章:群晖拉取Docker镜像失败?使用 CloudFlare Worker代理加速拉取Docker容器镜像
2️⃣配置容器访问宿主GPU
查询核显路径:
 ls /dev/dri
#若无输出请排查是否有显卡(含核显)、是否可被PVE驱动、是否已经将显卡(含核显)直通给了其他虚拟机?
#比如去除显卡(含核显)黑名单、关闭直通显卡(含核显)的虚拟机并重启。
比如输出是:by-path card0 renderD128
记录核显文件路径为: /dev/dri/card0和/dev/dri/renderD128
创建容器后先不要启动,选中容器 – 资源 – 添加 – 设备直通,依次添加上述两个路径,并将权限设置为0777,点击添加。
这些配置让LXC容器能够直接使用宿主机的显卡设备。
3️⃣路径挂载
一般不在jellyfin中直接存放影视资源,而是挂载路径,比如现将NAS的文件夹通过挂载到PVE:
在NAS中设置NFS或SMB共享权限,再点击PVE的数据中心 – 存储 – 添加 – NFS或SMB挂载影视资源的目录,记录路径。
pct set 104 -mp0 /mnt/pve/ds,mp=/media
其中/mnt/pve/ds为PVE中的挂载的路径, /media为jellyfin挂载后的目录路径。
4️⃣访问与配置Jellyfin
完成上述步骤后,即可通过 http://<你容器的IP地址>:8096 访问Jellyfin的Web设置界面。
在初始设置后,需要进入 “控制台” > “播放” 页面,将 “硬件加速” 选项设置为
- Intel显卡:“Intel QuickSync (QSV)”,其他选项如“启用硬件编码”等,可以根据你的支持情况勾选。
- AMD显卡:“视频加速API(VAAPI)”,其他选项如“启用硬件编码”等,可以根据你的支持情况勾选。
5️⃣2点说明:
- 在所建容器 – 选项 – 控制台模式 – 编辑,可以修改为shell,以便于在容器控制台使用shell命令行。
- 在所建容器 – 选项 – Environment – 编辑,可以修改需要的环境变量。
intel:
apt install intel-gpu-tools -y

#查看核显使用率:
intel_gpu_top
AMD查看显存占用:
apt install radeontop

#输出包含显存使用量、GPU负载、温度等关键指标,按m键可切换显存视图。
radeontop
六、尾巴
设置开机启动顺序、IP标记之类…


前排支持!